Monday, 26 December 2016

Secret Santa and Trains

I have had to post this after Christmas as it was a Secret Santa present and I could not risk anyone from my family seeing it. There is only one person in my family who truly appreciates trains for what they are; my dad!

Impossible to buy for as it is and to find something that would fit in a cracker would be anyone's nightmare! So, I put my degree to use and made a small silver train cutout which can be on display for everyone's pleasure.

This is the image I traced...


What a lovely train!
Anyway, Once I had the measurements, I was able to order the silver.
To keep up my reputation for being eco-friendly, I bought a small piece from the Cooksongold Ecosilver range.


The silver was prepared to be pierced out.
I traced the original image in such a way to retain some detail without making area's of the final piece weak. Holes were drilled for the detail to be pierced out;


and darn! look at the sun shining through them!
Piercing out was a faff...


but golly! Look how it reflects my bench peg!


The edges were filed and a surface finish given.


Oooh and look at the shadow it makes!


ANYWAY! This silver train was going into a cracker so it needed some protection; a small cardboard envelope to stop it from bending perhaps?


It needed to stand up, it couldn't be a flat thing to have in the cabinet, no one would see it! So a teeny tiny stand was made.


Last but not least, I had it Hallmarked.


Lovely!

Sunday, 25 December 2016

Festive Dinosaurs

The dinosaurs decided to have a party as the theme for their Christmas cards!


Can't forget those I work with!


What cheeky dinosaurs!

Merry Christmas my lovely Moment-eers!!

Tuesday, 13 December 2016

Tiny elephants

During August, I went to the Rock Gem n Bead show at Harrogate Pavilion and my mad eccentric boyfriend found these tiny bone elephants...


So I turned them into earrings for Christmas! They even have my stamp on the small tab!


Saturday, 10 December 2016

Cunning Dinosaurs, plan in action!

So the dinosaurs have asked me to do the same designs as the wrapping paper, to keep the theme running you see.

The also wanted me to show you the breakdown of it all so you understand their intensions.
So here's the breakdown:

  • Red bows - Green tag
  • Green Christmas tree - Red tag
  • Green Holly - Red tag
  • Gold bells - Silver tag
  • Silver stars - gold tag
This is how I have done the wrapping paper as you well know.

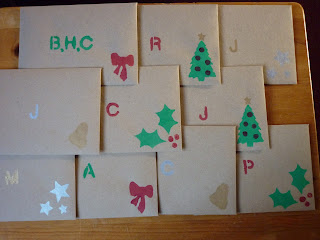
This is what I have come up with...


I have added a bit of glitter to each card to really make it look Christmassy.
And here are the finished envelopes...


Hopefully the dinosaurs will like it because there are 7 of them and 1 of me!

Wednesday, 7 December 2016

On Wednesdays, we wear pink

On Wednesdays, Yes, we do wear pink. Any budding Mean Girls fan will recognise that quote.
So as a birthday present for my sister back in October, I made her some pink earrings to wear on Wednesdays!


I of course included my snail and initial mark.


And I loved how the sun shone on the small glass beads.


Monday, 5 December 2016

You CAN do it

When I was little, I grew up watching Disney films, along with millions of other children across the entire world. This is still incredibly true to this day.

And who can blame us?!


115 years ago today, a legend was born.
And his work thrives today!

Sunday, 4 December 2016

Stamping out the wrapping paper

Blimey it has been busy and it is only the beginning of December!
But would you believe it, I have bought about 95% of my Christmas presents and already wrapped them all!
Well you can't blame me for being keen!

Fortunately I have had this last week off so I have been able to crack(er) on with the festivities, including a shopping trip to York and an entertaining evening at Beamish!

Being part time gives you alot of extra time which you somehow need to fill. So I thought I would make Christmas that little bit more special by making all the Christmas cards and the wrapping paper.

Stencils and paint to hand...


I started stencilling!


I had 5 designs overall, 1 design per 2 people.
In opposite colours, I made gift tags.


So red wrapping paper, had a green tag, green had a red tag, gold with silver and silver with gold.
And ta-dah! The final paper!


A very small selection of the wrapped presents so you are able to see each paper design.
The finishing touches (bows and bells) will be added before they are put under the tree. We don't want flat bows on Christmas Day!

Monday, 21 November 2016

Toilet rolls and snow

As toilet rolls have been emptied and discarded
I have secretly been collecting and had them regarded

One by one as the number of toilet rolls increase
snowflakes are being made with glitter, paint and glitz.

I realise now this post is rhyming with a pinch
I should not have read Dr Seuss' 'The Grinch'

My first snowflake, all red and glittery
was a bit of a faff and a little bit trickery.


Snowflakes two and three were more well planned
painted simply with more time to hand.


Number four is all blue and sparkly
while flake number five is pink and harkly.


There are plenty of designs out there
if you take a look with a bit of care

Simply google 'toilet roll snowflakes' or 'toilet roll decorations'
and let it be the start of new creative foundations.

Some are pretty and delicate
and some are great fun.
Others are full of character
whilst others are... very outdone!

Sunday, 6 November 2016

Cunning Dinosaurs

These little fellows have a cunning plan for Christmas and they need my help!


See, they have already started talking amongst themselves...
Stay tuned to find out what their mega idea will be!

Friday, 4 November 2016

Christmas has already begun!

This year, I am being super duper prepared! I officially started my Christmas shopping near to the beginning of August (came across some things just by chance! Right place, right time!), I have wrapped the presents I have so far bought (post about the wrapping paper to come later!) and I am on with the making of the cards (again, another post to come later!).


I have alot to do so better get cracking! See you in a hoot!

Wednesday, 28 September 2016

Blue birdbath

On Sunday, with my infinite wisdom, I decided to make a birdbath. Lucky birds!
I already had an idea in my head and I knew exactly how to go about it. I even had everything I needed!

First things first, I needed to remove the original wooden table from the post. Crikey, it had rotted beyond repair! The bird feeders which were (somehow) hanging from the underneath, were moved to a tree and are still happily being used!

I thought it best to treat the post to prevent it from rotting, like the table...
Whilst the post was drying, I begun the making of my idea!

I had a small shallow trug and a hanging basket of a similar size.


Removing the chain then with a large mallet, I hammered the base of the hanging basket so it was flat, and the same diameter as the trug.


It was a pleasant sunny day on Sunday, so the top of the post dried incredibly quickly.
Using a regular hammer this time, and 4 large wood staples, the basket was hammered to the top of the post.


Lovely!


With the basket and trug in place, I needed a layer of something at the bottom of the trug for the birds to perch on as they bathed.
Shells were awkward and had sharp edges on which the birds might damage or injure themselves.


However beautiful shells may be, they are not practical for a birdbath. Fortunately, there were plenty of pebbles lying around the garden for me to use!


That's better!
It's hard to tell from the picture but the pebbles are positioned to make a slope. This ensures birds of all sizes are able to bathe at a depth comfortable to them.
I enjoy hearing idea's from other people. My mum suggested putting a stick in, to create a more natural 'puddle'. So in went a stick along with the water!


It also makes a lovely perching post!


Realising how bare and very strange looking this birdbath appeared, it needed something a little more organic. Like a water plant which acts a bit like ivy...


Ah! That will do!
That will twist and weave through the hanging basket in no time!

Saturday, 6 August 2016

Counting the Birthdays

WOW! I haven't been on here for a while! I still have posts from Christmas still to write... I think they can wait!

Back in February, nearly half a year ago now, I made my older twin sisters a watch each.
The idea suddenly sprung on me whilst wandering around the Rock Gem n Bead show at Harrogate Pavilion. There was a stall selling watches and bracelets, from Australia, made from leather strips and threaded with wooden beads.

I knew I could make them cheaper than what they were selling them for and I was in the right place to buy everything I needed.


The beige watch was the first to be made. I now know what to do so any other watches I make in the future will go far more swimmingly than that of the first attempt! (sorry Catherine!)


There was alot to take into consideration. I couldn't give them a basic watch because where is the fun in that? For the dinosaur lover, a dinosaur charm was added. A plain watch face was used as not to 'over do' the finished piece. The watch was messy as it was, I didn't need to make it worse by adding an ornate watch face!

The blue, having a less awkward watch face to work with, went alot quicker and much easier!


The design was more simple, helped by the fact the watch had a different sort of fixture! More uniform shaped beads were added allowing for the ornate watch face to be used. A small mushroom seemed rather fitting for this design and the overall piece seems more controlled.

It seemed only right to wrap them, given they were birthday presents! So I whipped up a couple of tiny gift bags and they were done!


Perfect!